Sunday, December 8, 2019

Dreamforce 2019 Takeaway - My own way

Motivation behind this


This is my first Dreamforce experience after spending 9 years in Salesforce ecosystem. Thanks to Salesforce for providing free full conference pass for MVP and specials thanks to my company Tavant for giving an opportunity to attend this event which I have been waiting for a long time.

During my attendance, I have gathered some technical piece of information which I thought of sharing those. Hope those are not subject to copyright for sharing as it is.


Announcements


Here is brief of Dreamforce Announcement at a glance. For more information, refer Your Quick Overview of All Dreamforce ‘19 Announcements


Mini Hacks


There are 8 mini hacks and completing those goodies can be achieved.

Automate Common Sales Team Request


Build a Park Management App


Engage users with In-App Guidance


Manage Travel Approvals


Process Automation with DocuSign for Salesforce and Process Builder


Setup a Requirements Elicitation Process


Simple Interest Calculator


Work with the Sample Gallery


Lightning Integration Solutions by Use Cases


I have attended Salesforce booth on this and here is Lightning Integration Solution Video


Solution


Think like an Integration Architect - Case Study


List of Patterns and Selection Guide


Patterns to Lightning Integration Tools Mapping


Case Study


Current State Architecture


What is the future state architecture?


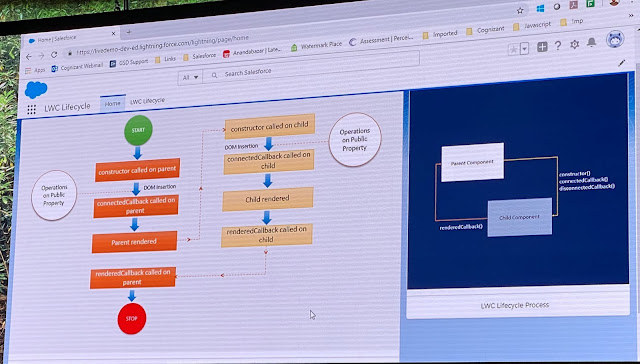
LWC Life Cycle - Do (s) and Don't (s)


Summary

Overall flow


Do (s) and Don't (s)


Booth Videos


Here are some important topics which I have captured at booths.

Blockchain


Video: Blockchain in action

Einstein Prediction Builder


Video: Einstein Prediction Builder

Tableau


Video: Tableau

MuleSoft


Video: MuleSoft Anypoint Platform

Process Automation


Video: Process Automation Strategies

Salesforce Maps


Video: Salesforce Maps

Team Collaboration at VS Code


Video: Salesforce Extension Pack for VS Code


Trailblazer Community Gatherings


The Dreamforce experience is incomplete until we meet inspiring Trailblazer Community members. I got invitation to join India Community Meet and MVP Celebration Meet.

Here is a snap.


And there are much more.

Overall it was a memorable experience for a life time. 

Friday, November 1, 2019

Supplementary - Extend Salesforce Implementation with Heroku Webinar

Motivation behind this


This is my first experience on delivering webinar with Salesforce and during this course of preparation I have learnt a lot from Salesforce Team. Thanks to all of them.

To explore Lightning Web Components Open Source (LWC OSS) components that's need to be deployed in Heroku there are steps to be followed which has been delivered during our webinar. 

Sharing those steps which will help developers to extend this functionality.

Recording of CodeLive session


Pre-requisites 


Followings are the pre-requisites:


Step by Step process and related references


a) Create first LWC Open source App


 Refer lwc.dev and run the following CLI steps


npx create-lwc-app my-app
cd my-app
npm run watch

App will be visible running at Local Server (https://localhost:3001)


b) Steps to deploy LWC OSS App at Heroku


Create a Procfile with web: npm run serve and place the file under root folder.

Run the following command


heroku login
git add .
git commit -m "Intial Commit"
git push heroku master
heroku open

Optionally, we could also run git remote -v to see the remote URLs get created.

Navigate to *.herokuapp.com and see the output.

Presentation Video at 22:15


c) Setting up Heroku Postgres database


  1. Navigate to Heroku Dashboard, and click on App
  2. Go to Resources
  3. In the Add ons section, search for Heroku PostGres, and click Provision
  4. Navigate to Settings and see Config Vars. See that Database URL got added
Presentation Video at 36:01

d) Setting up Heroku Connect


Refer Set Up Heroku Connect Trailhead Module


After that, from the Heroku Dashboard:
  • Go to settings and expand database credentials
  • Copy Database URI value, and Heroku CLI value

e) Locally query for remote data from Postgres


We can run Heroku CLI to see the remote data.

Presentation Video at 46:13

Run following command


heroku pg:psql postgresql-cubic-28239 --app warm-ravine-31983


And execute your query like: 


SELECT * FROM salesforce.product__c

Unlike SOQL, it supports (*) to retrieve all field values.

Output:


f) Update App to connect to Postgres 


Run following command to install dependency


npm install pg

  • Add following code to retrieve records from data and preparing JSON.


 1
 2
 3
 4
 5
 6
 7
 8
 9
10
11
12
13
14
15
16
17
18
19
20
21
22
23
24
25
26
27
28
29
30
const { Client } = require('pg');
module.exports = app => {
    // put your express app logic here
    
    app.get('/data/products', (req, res) => {
        var products = [];
        const client = new Client({
            connectionString: process.env.DATABASE_URL,
            ssl: true
        });
        client.connect();
        client.query(
            'SELECT sfid,name,picture_url__c,price__c FROM salesforce.product__c;',
            (err, data) => {
                if (err) console.log(err);
                products = data.rows.map(productRecord => {
                    return {
                        id: productRecord.sfid,
                        name: productRecord.name,
                        price: '$' *+* productRecord.price__c,
                        quantity: 0,
                        picture: productRecord.picture_url__c
                    };
                });
                res.json(products);
                client.end();
            }
        );
    });
};

  • Create entry in .env file (placing under root directory) for DATABASE_URL

npm install dotenv

  • Make necessary changes on Client side .js file to display data.
Refer Documentation: Connecting in Node.js

Running locally it will display following output

Presentation Video 56:22


g) Setting up connection with Salesforce


JSForce (f.k.a. Node Salesforce) is a isomorphic JavaScript Library utilizing Salesforce's API: It works both in browser and with Node.js.

It encapsulates the access to various APIs provided by Salesforce in asynchronous JavaScript function calls.

Run following command to install dependency


npm install jsforce

And use following code to establish connection inside /server/index.js file

Define SF_USERNAME and SF_PASSWORD in .env file.


const jsforce = require('jsforce');

const { SF_USERNAME, SF_PASSWORD } = process.env;
if (!(SF_USERNAME && SF_PASSWORD)) {
    console.error(
        'Cannot start app: missing mandatory configuration. Check your .env file.'
    );
    process.exit(-1);
}
const conn = new jsforce.Connection({
    loginUrl: 'https://login.salesforce.com'
});
conn.login(SF_USERNAME, SF_PASSWORD, err => {
    if (err) {
        console.error(err);
        process.exit(-1);
    }
});

Refer documentation: JSForce Connection


h) Insert data using webservice callout


In the demo, we have also installed body-parser.
Node.js body parsing middleware which parses incoming request bodies in a middleware before your handlers, available under the req.body property.
npm install body-parser

In the /server/index.js file use following code to make callout.


module.exports = app => {
 app.use(express.json());

app.post('/data/placeOrder', (req, res) => {
        conn.apex.post('/placeOrder/', req.body, (err, data) => {
            if (err) {
                console.error(err);
            }
            res.json(data);
        });
    });
};

This will get called from front-end /client/productList.html.


 1
 2
 3
 4
 5
 6
 7
 8
 9
10
11
12
13
14
15
16
17
18
19
20
21
22
23
24
25
26
handleClick() {
 let emailaddress = this.template.querySelector('.emailaddress').value;
 let obj = {
  email: emailaddress,
  productList: JSON.stringify(this.allProducts)
 };
 if (emailaddress.length === 0) {
  // eslint-disable-next-line no-alert
  alert('Please enter email address');
 } else {
  fetch('data/placeOrder', {
   method: 'POST', // or 'PUT'
   body: JSON.stringify(obj), // data can be `string` or {object}!
   headers: {
    'Content-Type': 'application/json'
   }
  })
  .then(response => {
   return response.json();
  })
  .then(data => {
   // eslint-disable-next-line no-alert
   alert(data);
  });
 }
}

Refer Documentation: Fetch API

i) Setting up external GIT environment


In the Heroku dashboard:


  • Go to deploy tab of the app
  • Connect to GitHub
  • Select Repo, Enable Auto Deploys


Run following command to add origin and verifying


git remote add origin https://github.com/<yourrepo>/XXXXX.git
git remote -v

Presentation Video 1:15:45

j) Setting up Pipeline

A pipeline is a group of Heroku apps that share the same codebase. Each app in a pipeline represents one of the following stages in a continuous delivery workflow: 
  • Development
  • Review
  • Staging
  • Production


Refer Documentation: pipelines


k) Scaling


Further References:


Friday, October 4, 2019

Capture Signature using HTML Canvas inside Salesforce Lightning Web Components

Motivation behind this


I am exploring Lightning Web Components and thought of preparing an use case on signature capturing functionality, but want to leverage native HTML Canvas element without using any 3rd party libraries. Earlier I have worked on this type of functionality using Visualforce page and didn't find any post on Lightning Web Components which motivates me to do this proof-of-concept. Though there are couple of solutions available using Lightning Aura Components.

There are few challenges I have faced during this development which I want to share to community members.

Let's get started.

Use Case


Business has a requirement to capture a signature of the Customer for finalizing a deal. 


Developer wants to build using Lightning Web Components without 3rd party libraries and want to leverage native HTML functionalities.

Possible End Results


After building the use case, it will perform the functionality as following video:


Solution Approach


We will create captureSignature component for this functionality.

Flow Diagram


Create a flow diagram like this way to understand the functionalities, flow of control and finalize design approach.


Before going through this below section, it will be better to go through my post on Salesforce Lightning Web Components Cheat Sheet to have overall idea for all types of properties, methods, event propagation etc.

captureSignature component:

captureSignature.html will prepare a screen like this:


Code is as follows:

HTML canvas element is used.


<template>
    <lightning-card class="slds-align_absolute-center" 
                title="Signature Capturing using HTML Canvas and Lightning Web Components" 
                icon-name="custom:custom30">
    <div class="c-container"> 
        <div style="text-align: center; "> 
            <h2 class="slds-text-heading_medium slds-m-bottom_medium">
                Sign Here
            </h2>            
            <p class="slds-m-bottom_small"> 
                <canvas name="canvasItem" style="border:2px solid rgb(136, 135, 135);
                background: transparent;"></canvas>
            </p>
            <p class="slds-m-bottom_small"> 
            <lightning-button variant="brand" label="Save" title="Save" 
                onclick={handleSaveClick} class="slds-m-left_x-small"></lightning-button>
            
            <lightning-button variant="brand" label="Clear" title="Clear" 
                onclick={handleClearClick} class="slds-m-left_x-small"></lightning-button>
            </p>
        </div>       
    </div>
    </lightning-card>
</template>

captureSignature.js

This is most important for implementing this functionality and if we follow the flow diagram it is easy to understand which methods are performing which responsibilities. Some important points to be highlighted:
  • import LightningElement, saveSign and ShowToastEvent which will be used in this class.
  • add event listeners for different mouse activities in constructor.
  • Required calculations have performed at setupCoordinate, redraw and drawDot methods.
  • handleSaveClick method, following below lines have been added otherwise canvas background will show black after generating image:
ctx.globalCompositeOperation = "destination-over";
ctx.fillStyle = "#FFF"; //white
ctx.fillRect(0,0,canvasElement.width, canvasElement.height);

  • handleSaveClick method, convert canvas drawing element to base64 encoded URL and then imperative way saveSign method is called.
  • We have used Javascript promise to show the results and errors.
saveSign({strSignElement: convertedDataURI})
 .then(result => {
  //parse result
 })
 .catch(error => {
  //show error message
  
 });

Entire js file as below:


  1
  2
  3
  4
  5
  6
  7
  8
  9
 10
 11
 12
 13
 14
 15
 16
 17
 18
 19
 20
 21
 22
 23
 24
 25
 26
 27
 28
 29
 30
 31
 32
 33
 34
 35
 36
 37
 38
 39
 40
 41
 42
 43
 44
 45
 46
 47
 48
 49
 50
 51
 52
 53
 54
 55
 56
 57
 58
 59
 60
 61
 62
 63
 64
 65
 66
 67
 68
 69
 70
 71
 72
 73
 74
 75
 76
 77
 78
 79
 80
 81
 82
 83
 84
 85
 86
 87
 88
 89
 90
 91
 92
 93
 94
 95
 96
 97
 98
 99
100
101
102
103
104
105
106
107
108
109
110
111
112
113
114
115
116
117
118
119
120
121
122
123
124
125
126
127
128
129
130
131
132
133
134
135
136
137
138
139
140
141
142
143
144
145
146
147
148
149
150
151
152
153
154
155
156
157
/* eslint-disable no-console */
import { LightningElement } from 'lwc';
import saveSign from '@salesforce/apex/SignatureHelper.saveSign';
import { ShowToastEvent } from 'lightning/platformShowToastEvent';

//declaration of variables for calculations
let isDownFlag, 
    isDotFlag = false,
    prevX = 0,
    currX = 0,
    prevY = 0,
    currY = 0;            
       
let x = "#0000A0"; //blue color
let y = 1.5; //weight of line width and dot.       

let canvasElement, ctx; //storing canvas context
let attachment; //holds attachment information after saving the sigture on canvas
let dataURL,convertedDataURI; //holds image data

export default class CapturequestedEventignature extends LightningElement {
    
    //event listeners added for drawing the signature within shadow boundary
    constructor() {
        super();
        this.template.addEventListener('mousemove', this.handleMouseMove.bind(this));
        this.template.addEventListener('mousedown', this.handleMouseDown.bind(this));
        this.template.addEventListener('mouseup', this.handleMouseUp.bind(this));
        this.template.addEventListener('mouseout', this.handleMouseOut.bind(this));
    }

    //retrieve canvase and context
    renderedCallback(){
        canvasElement = this.template.querySelector('canvas');
        ctx = canvasElement.getContext("2d");
    }
    
    //handler for mouse move operation
    handleMouseMove(event){
        this.searchCoordinatesForEvent('move', event);      
    }
    
    //handler for mouse down operation
    handleMouseDown(event){
        this.searchCoordinatesForEvent('down', event);         
    }
    
    //handler for mouse up operation
    handleMouseUp(event){
        this.searchCoordinatesForEvent('up', event);       
    }

    //handler for mouse out operation
    handleMouseOut(event){
        this.searchCoordinatesForEvent('out', event);         
    }
    
    /*
        handler to perform save operation.
        save signature as attachment.
        after saving shows success or failure message as toast
    */
    handleSaveClick(){    
        //set to draw behind current content
        ctx.globalCompositeOperation = "destination-over";
        ctx.fillStyle = "#FFF"; //white
        ctx.fillRect(0,0,canvasElement.width, canvasElement.height); 

        //convert to png image as dataURL
        dataURL = canvasElement.toDataURL("image/png");
        //convert that as base64 encoding
        convertedDataURI = dataURL.replace(/^data:image\/(png|jpg);base64,/, "");
        
        //call Apex method imperatively and use promise for handling sucess & failure
        saveSign({strSignElement: convertedDataURI})
            .then(result => {
                this.attachment = result;
                console.log('attachment id=' + this.attachment.Id);
                //show success message
                this.dispatchEvent(
                    new ShowToastEvent({
                        title: 'Success',
                        message: 'Attachment created with Signature',
                        variant: 'success',
                    }),
                );
            })
            .catch(error => {
                //show error message
                this.dispatchEvent(
                    new ShowToastEvent({
                        title: 'Error creating Attachment record',
                        message: error.body.message,
                        variant: 'error',
                    }),
                );
            });
            
    }

    //clear the signature from canvas
    handleClearClick(){
        ctx.clearRect(0, 0, canvasElement.width, canvasElement.height);          
    }

    searchCoordinatesForEvent(requestedEvent, event){
        event.preventDefault();
        if (requestedEvent === 'down') {
            this.setupCoordinate(event);           
            isDownFlag = true;
            isDotFlag = true;
            if (isDotFlag) {
                this.drawDot();
                isDotFlag = false;
            }
        }
        if (requestedEvent === 'up' || requestedEvent === "out") {
            isDownFlag = false;
        }
        if (requestedEvent === 'move') {
            if (isDownFlag) {
                this.setupCoordinate(event);
                this.redraw();
            }
        }
    }

    //This method is primary called from mouse down & move to setup cordinates.
    setupCoordinate(eventParam){
        //get size of an element and its position relative to the viewport 
        //using getBoundingClientRect which returns left, top, right, bottom, x, y, width, height.
        const clientRect = canvasElement.getBoundingClientRect();
        prevX = currX;
        prevY = currY;
        currX = eventParam.clientX -  clientRect.left;
        currY = eventParam.clientY - clientRect.top;
    }

    //For every mouse move based on the coordinates line to redrawn
    redraw() {
        ctx.beginPath();
        ctx.moveTo(prevX, prevY);
        ctx.lineTo(currX, currY);
        ctx.strokeStyle = x; //sets the color, gradient and pattern of stroke
        ctx.lineWidth = y;        
        ctx.closePath(); //create a path from current point to starting point
        ctx.stroke(); //draws the path
    }
    
    //this draws the dot
    drawDot(){
        ctx.beginPath();
        ctx.fillStyle = x; //blue color
        ctx.fillRect(currX, currY, y, y); //fill rectrangle with coordinates
        ctx.closePath();
    }
}

SignatureHelper.cls

saveSign method takes String parameter which has been used as Attachment body after decoding. Here we have saved the Attachment under a Dummy Contact record.


 1
 2
 3
 4
 5
 6
 7
 8
 9
10
11
12
13
14
public with sharing class SignatureHelper {
    
    @AuraEnabled
    public static Attachment saveSign(String strSignElement){
            Contact con = new Contact(Id='0032v00002ypAntAAE');
            Attachment objAttachment = new Attachment();
            objAttachment.Name = 'Demo-Signature.png';
            objAttachment.ParentId = con.Id;
            objAttachment.ContentType = 'image/png';
            objAttachment.Body = EncodingUtil.base64Decode(strSignElement);        
            insert objAttachment;
            return objAttachment;       
    }
}

When we initially try to save attachment, we could face this below error if (cacheable=true) is used with @AuraEnabled

Too many DML statements: 1 out of 0 Error

which means that component is readonly and it doesn't allow to perform DML operation.

That's why cacheable=true is omitted. 

Nice learning!

meta files should include where these components are available.

Create a Lightning App Builder page with one region and place this component and run the application, it will display the screen as above.

Finally, we are done and thanks for reading.


References


Further Reading