Friday, September 10, 2021

Administering B2B Commerce Lightning at Developer Edition


Motivation behind this


I have been exploring B2B Commerce Lightning since last year through Partner Enablement program designed by Salesforce. Right now, Salesforce is enabling partners through Partner Learning Camp and there are many courses available including B2B Commerce Admin and Developer.
Recently, B2B Commerce license is available at any Developer Edition which drives to me to build a website.

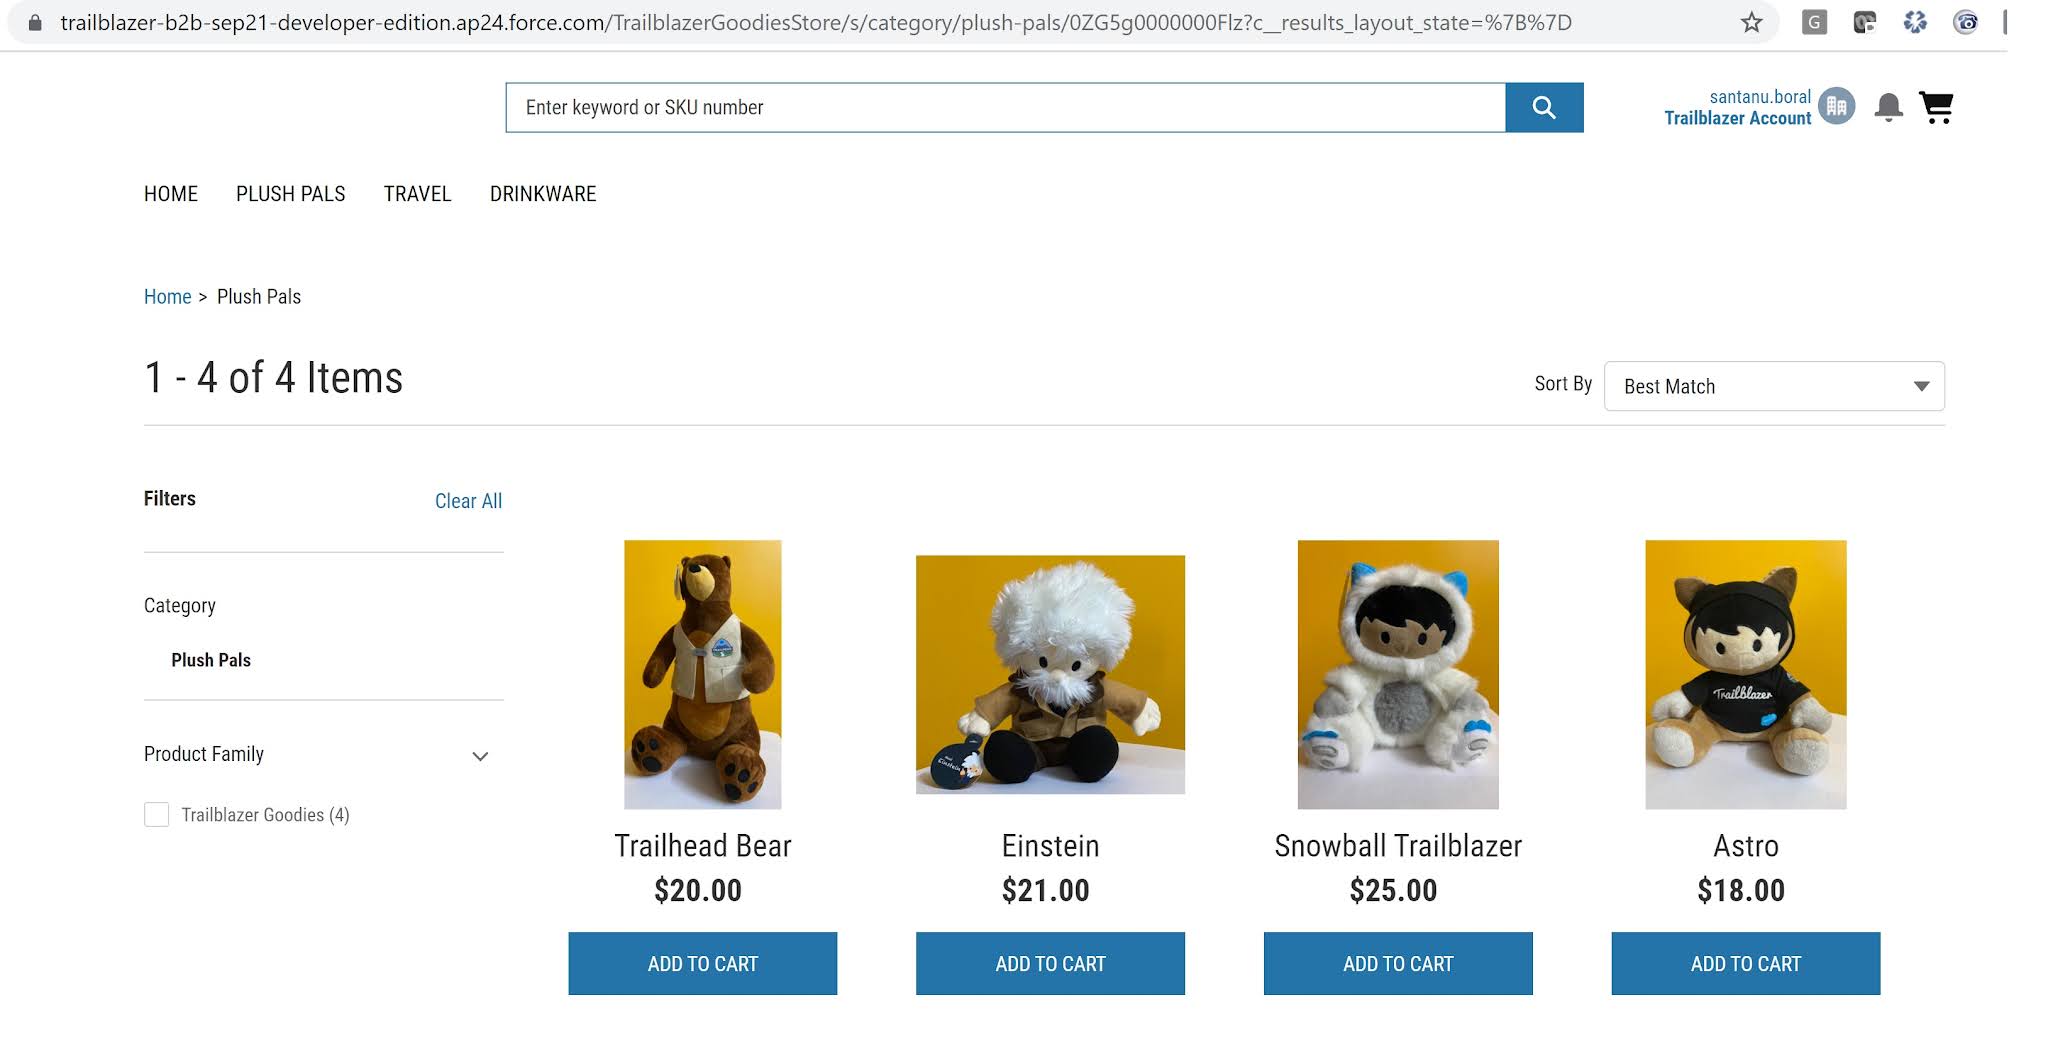
For purpose of building this website, I have taken few snaps of the goodies which I have received/achieved from Salesforce which can be a get start to build this.

During this journey, Abdul Molla has helped me a lot which drives to write for all the Trailblazers who are interested to learn B2B Commerce.

Lets' get started.

Basics to know


B2B Commerce Lightning has been developed on Experience Cloud, CMS, Flows, Lightning Web Components. So better to get familiar on those. 

Before start configuring, following trailhead module will help to understand basics.

Steps to follow


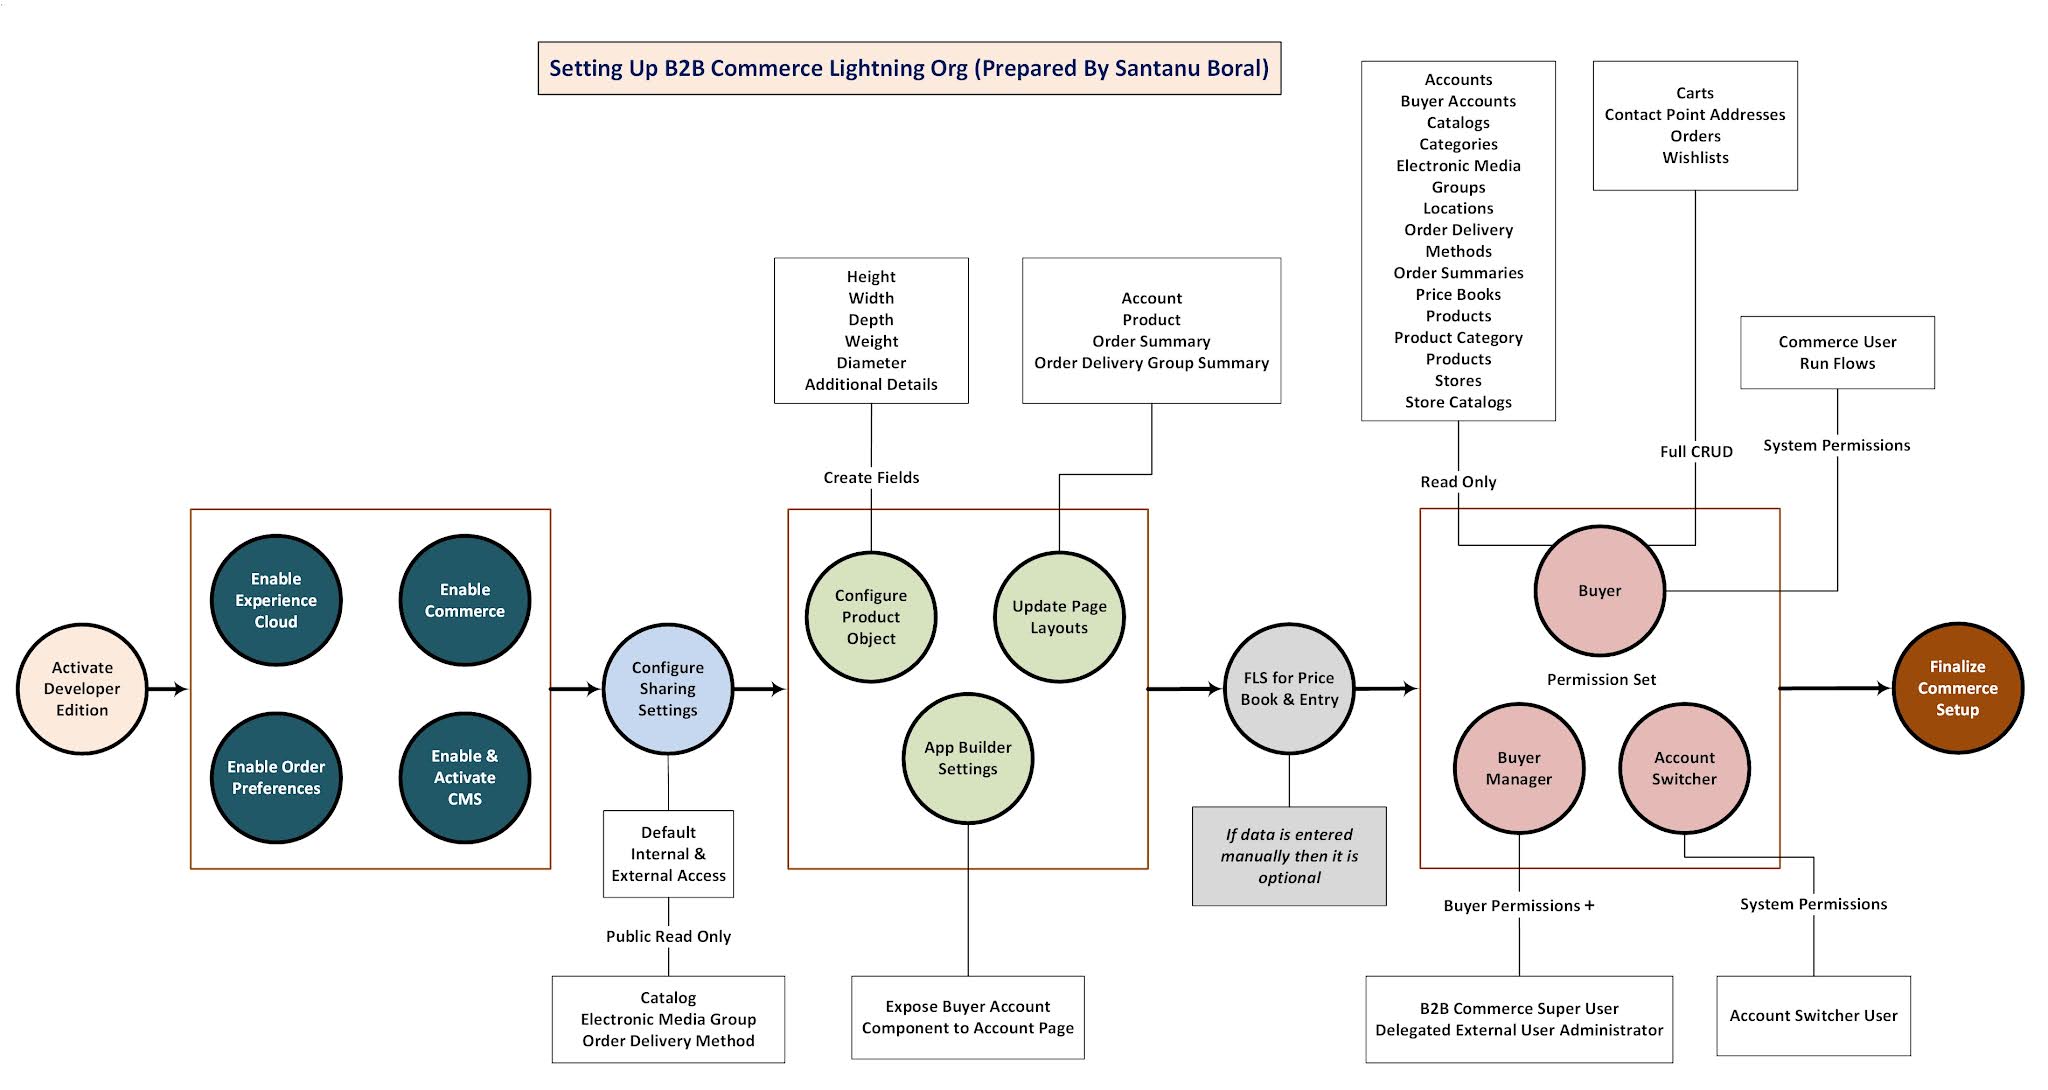
We will go step by step as I have shown in following diagram.


For easy reference, color of each heading below will match the color of symbol of above picture.

1. Sign up a Developer Edition


    Follow this link

2. Enable Experience Cloud


    a) From Setup à Digital Experiences, enable Experience Cloud and create a domain.


   b) Choose - Allow using standard external profiles for self-registration, user creation, and login.


3. Enable Commerce


    From Setup, you can reach here to enable commerce. This is heart of B2B Commerce.


4. Enable Order Preferences


    From Setup, reach Order Settings and choose Enable Enhanced Commerce Orders. Choose other 2 options as shown in picture.


4. Enable & Activate CMS


    a) Edit System Administrator profile and choose Salesforce CMS at Custom App Settings section.


 b) Go to Tab Setting Section and make following tabs as Default On for these 4 CMS items:
  • CMS Home
  • CMS Channels
  • CMS Experiences
  • CMS Workspaces
c) Make following tabs to Default On too.
  • Commerce Setup
  • Buyer Group Price Books 
  • Buyer Groups
  • Catalogs
  • Categories
  • Entitlement Policies 
  • Guest Buyer Profile
  • Price Adjustment Schedules
  • Pricing Workspace
  • Product Workspace
  • Store Price Books
  • Stores
  • Order Summaries
d) Verify CMS

From App Launcher open Salesforce CMS App and verify tabs.


5. Configure Sharing Settings


Sharing Settings, make Default Internal Access and Default External Access to be Public Read Only for:


  • Catalog
  • Electronic Media Group
  • Order Delivery Method

6. Configure Product Object


Create following Custom fields in Product and assign it to Customer Community Plus User.
  • Height
  • Width
  • Depth
  • Weight
  • Diameter
  • Additional Details

7. Update Page Layouts


a) Product Page Layout
  • Product SKU field to be added in layout
  • Categories and Commerce Entitlement Policies to be added in related list
b) Order Summary Page Layout

Keep only Start Reorder action at at Salesforce Mobile and Lightning Experience Actions section and remove others.


c) Order Delivery Group Summary Page Layout

Add Product Name as column in Order Product Summaries Related List


d) Account Page Layout

  • Add Community Members and Contact Point Address as Related List
  • Enable as Buyer actions to be added in Salesforce Mobile and Lightning Experience Actions


8. App Builder Settings - Account Record Page


Choose any Account record and edit Page, drag Buyer Account component to the page layout.


9. Field Level Security for Pricebook and PriceBookEntry


a) Create ExternalId field (ExternalId__c) at PriceBook object and make is visible to Customer Community Plus user

b) Navigate to Standard Price Book record and update ExternalId = standardpricebook and Active=true
(You can create a new List View to see list of price book records)


c) Create ExternalId field (ExternalId__c) at PriceBookEntry object and make is visible to Customer Community Plus user

This is needed if we load data through dataloader and if pricing is available from outside of Salesforce.

10. Permission Sets for Buyers, Buyer Managers and Account Switchers


a) Buyer Permission Set

  • Create permission set name as Buyer and assign Customer Community Plus license


  • Assign Read access to following objects:
    • Accounts
    • Buyer Accounts
    • Catalogs
    • Categories
    • Electronic Media Groups
    • Locations
    • Order Delivery Methods
    • Order Summaries
    • Price Books
    • Products
    • Product Category Products
    • Stores
    • Store Catalogs
Here is an example:
  • Assign Full CRUD access to following objects:
    • Carts
    • Contact Point Addresses
    • Orders
    • Wishlists
  • For Contact Point Address object, assign Read permission to all fields.


  • Assign System Permissions
    • Commerce User
    • Run Flows

b) Buyer Manager Permission Set
  • Clone Buyer permission set and name it as Buyer Manager.
  • From System Permissions, choose B2B Commerce Super User
  • From App Permissions, choose Delegated External User Administrator
b) Account Switcher Permission Set
  • Create a new permission set called Account Switcher and assign Customer Community Plus license
  • In the System Permission section, choose Account Switcher User

11. Finalization of Commerce Setup


a) Enable Data Translation and Multi-Currency from Company Information


b) Field Accessibility - 

  • From Setup -> Field Accessibility -> Select Order object -> View By Fields -> Choose Sales Store
  • Select System Administrator profile to make it visible

  • Commerce Setup from App Launcher and verify this

  • Install 3 out-of-box reports clicking on Commerce Setup
    • Average Order Value
    • Orders By Date
    • Total Orders

That's all. Thanks for your patience to complete.

In the next post, we will Configure the Store and complete checkout process which will look like this:


Happy Learning!

Thursday, July 15, 2021

Communicating Change Data Capture (CDC) with Lightning Web Component


Motivation behind this


I have been looking for a real-life use case on Change Data Capture which drives me to build a quick poc and writing this post.

So, lets get started!


Use Case


Business has a requirement to approve or reject a record when anyone of the approvers approves/rejects the request. When a record is submitted for approval there can be multiple approvers in the queue and anyone can take necessary action. There is a possibility that, multiple users can open the record for approval at the same time and the approver needs to spend time reading each items minutely, putting comments and so on. It might take some time to approve.

In the meantime, other approver can approve the same request which current user may not know that the record is stale. Normally, during approving/rejecting user can be alerted, but this is not a good user experience as he has to spend time on completing the form.

Business wants a pro-active alert on the screen when the record status gets changed without refreshing the screen.

You can also think about similar use case for seat reservation etc.

Possible End Results


After building the use case, it will perform the functionality as following screen. When record gets changed, the alert will be shown pro-actively as below without refreshing the screen. Also, clicking on refresh icon, record will be refreshed instantly. Don't miss the video at the end.


Solution Approach


It's a great way to develop this solution using CDC with Lightning Web Component.

Flow Diagram


Create a flow diagram like this way to understand the functionalities, flow of control to meet the requirement.


To learn about Change Data Capture visit trailhead module on Change Data Capture Basics.

All custom objects and few Standard Objects like  Account, Contact, Lead, User, Order, OrderItem, Product2, and others supports CDC.

Configuring CDC


Let's start with creating an object and configure CDC. Here for the sake of poc, I have created a custom object called Financial with few attributes as shown in the first picture.

Then though setup, Change Data Capture menu, assign Financial object for CDC as follows:


Event payload structure


Event message generates following structure, notice changeType, entityName and channelName. In this poc, only status field is changed.


{
    "data": {
        "schema": "WnzuUutBoNEU0Qbh60KQRg",
        "payload": {
            "LastModifiedDate": "2021-07-04T18:34:04Z",
            "ChangeEventHeader": {
                "commitNumber": 11105108170443,
                "commitUser": "0052v00000dRntzAAC",
                "sequenceNumber": 1,
                "entityName": "Financial__c",
                "changeType": "UPDATE",
                "changedFields": [
                    "LastModifiedDate",
                    "Status__c"
                ],
                "changeOrigin": "com/salesforce/api/soap/52.0;client=SfdcInternalAPI/",
                "transactionKey": "000282f7-ee3a-ad08-3fd0-29b2549ab4a8",
                "commitTimestamp": 1625423644000,
                "recordIds": [
                    "a072v00001UkmEKAAZ"
                ]
            },
            "Status__c": "Approved"
        },
        "event": {
            "replayId": 7805409
        }
    },
    "channel": "/data/Financial__ChangeEvent"
}


Lightning Web Component as Subscriber


changeDataNotificationComponent.html:

This UI displays notification on the screen.


<!--
  @description : This component shows the message when current record changes.
  @author      : Santanu Boral
-->
<template>
    <lightning-card title="Change Data Capture with EmpApi" icon-name="custom:custom14">
        <template if:true = {isDisplayMsg}>
        <div class="slds-notify slds-notify_alert slds-alert_warning" role="alert">
            <span class="slds-assistive-text">warning</span>
            <lightning-icon icon-name="utility:warning" alternative-text="Warning!" title="Warning">                
            </lightning-icon>
<h2>{responseMessage} &nbsp; <lightning-button-icon icon-name="utility:refresh" variant="bare" alternative-text="refresh" title="refresh" onclick={handleRefresh}> </lightning-button-icon>
</h2> </div> </template> </lightning-card>
</template>

changeDataNotificationComponent.js:

Few notable points in this js file:
  • Importing lightning/empApi for subscribing and unsubscribing.
  • Use of arrow function so that class level method (handleNotification) can be called using this operator.

const messageCallback = (response) => {
            console.log('New message received: ', JSON.stringify(response));
            // Response contains the payload of the new message received
            this.handleNotification(response);
        };
  • handleNotification checks if current record is updated and shows the message.
  • refreshing the record using getRecordNotifyChange of lightning/uiRecordApi, which is efficient way of refreshing the record. Isn't it?
Entire js file as below:


 1
 2
 3
 4
 5
 6
 7
 8
 9
10
11
12
13
14
15
16
17
18
19
20
21
22
23
24
25
26
27
28
29
30
31
32
33
34
35
36
37
38
39
40
41
42
43
44
45
46
47
48
49
50
51
52
53
54
55
56
57
58
59
60
61
62
63
64
65
66
67
68
69
70
71
72
73
74
75
76
77
78
79
80
81
import { LightningElement,api } from 'lwc';
import { subscribe, unsubscribe, onError, setDebugFlag, isEmpEnabled } from 'lightning/empApi';
import { getRecordNotifyChange } from 'lightning/uiRecordApi';

export default class ChangeDataNotificationComponent extends LightningElement {
    @api recordId;
    @api channelName; //'/data/Financial__ChangeEvent'

    subscription = {}; //subscription information
    responseMessage; //message to be shown at UI
    isDisplayMsg; //indicator for message to be displayed

    // Initializes the component
    connectedCallback() {       
        this.handleSubscribe();
        // Register error listener       
        this.registerErrorListener();   
        this.isDisplayMsg = false;   
    }

    // Handles subscribing
    handleSubscribe() {
        // Callback invoked whenever a new event message is received
        const messageCallback = (response) => {
            console.log('New message received: ', JSON.stringify(response));
            // Response contains the payload of the new message received
            this.handleNotification(response);
        };

        // Invoke subscribe method of empApi. Pass reference to messageCallback
        subscribe(this.channelName, -1, messageCallback).then(response => {
            // Response contains the subscription information on subscribe call
            console.log('Subscription request sent to: ', JSON.stringify(response.channel));
            this.subscription = response;
            this.handleNotification(response);
        });
    }

    // Handles unsubscribing
    handleUnsubscribe() {
        // Invoke unsubscribe method of empApi
        unsubscribe(this.subscription, response => {
            console.log('unsubscribe() response: ', JSON.stringify(response));
            // Response is true for successful unsubscribe
        });
    }


    registerErrorListener() {
        // Invoke onError empApi method
        onError(error => {
            console.log('Received error from server: ', JSON.stringify(error));
            // Error contains the server-side error
        });
    }

    //this method checks if current record got updated and shows message on UI
    handleNotification(response){
        if(response.hasOwnProperty('data')){
            let jsonObj = response.data;
            
            if(jsonObj.hasOwnProperty('payload')){
                let payload = response.data.payload;
                let recordIds = payload.ChangeEventHeader.recordIds;

                //find the current recordId in the array and if found then display message
                const recId = recordIds.find(element=> element == this.recordId);
                if(recId !=undefined){
                    this.isDisplayMsg = true;
                    this.responseMessage = 'Current record has changed, please refresh the page';
                }
            }
        }
    }

    //this method refreshes current record page
    handleRefresh(){
        getRecordNotifyChange([{recordId: this.recordId}]);
        this.isDisplayMsg = false;
    }
}

In the meta.xml create channelName as property which can be used to set design attribute and assign '/data/Financial__ChangeEvent' when placing this component on the record detail page.

Let's Test this!


Refer following video to simulate the functionality. Here the record has been opened in a record detail page and in a separate tab same record is edited from List View. The alert message will be displayed on record detail page.


Finally we are done and thanks for reading.

References

Further Reading


Saturday, May 29, 2021

Configurable Lightning Modal Popup with Field Set


Motivation behind this


Recently I got a requirement to build a configurable modal popup and it is to be developed using Lightning Web Components. Also, I got motivated watching Aditya Nag's (Salesforce) presentation on Design Patterns and Best Practices to build reusable Lightning Web Components following good design to develop this component.

The component is to be configurable so that even Admin can configure this. So, I have planned to leverage Field Set to make it. Earlier I have written a blog Build Configurable Dynamic Table from Field Set using Lightning Web Component.

Here design and event handling have been made in a different way. Let's get started.


Use Case


Business has a requirement to quickly create a record on a button click where fields will be displayed inside a modal form.

As, this requirement is quite common so developer wants to make it a reusable way using LWC. For testing purposes, create field set on Case Object.

Possible End Results


The component will look like this below:


Solution Approach


To develop this functionality, I have followed template-based designing, separation-of-concerns practices, and event propagations in a proper way.

Framed the following design:
  • There will be modal component modalComponentTemplate which will act as a template.
  • There will be a component createRecordFromFieldset which will develop screen elements using lightning-record-edit-form with a backend Apex calls to fetch field details from Field Set.
  • Spinner Component lwcSpinner for displaying spinner during load (here only HTML has been leveraged).
  • Container component lwcCreateRecordModalContainer will reuse this template and inject createRecordFromFieldset and Spinner into the unnamed slot and Submit & Cancel buttons to the footer slot. This component will expose to capture inputs from design attributes which is needed for Admin to set it up. This is the main component which drives the entire functionality.

Component composition is as follows:


Flow Diagram


The components will talk to each other as per the following diagram. This diagram depicts how components are loaded, events are propagated from parent-to-child and child-to-parent respecting each one's responsibilities.


Let's go through each components.

modalComponentTemplate


This template modal component code has been referred from lwc-recipes and customized for my need.

modalComponentTemplate.html

In this file, we can see there are sections for header, footer, and one unnamed slot that can be used for building body. There can be only one unnamed slot (<slot></slot>) in entire html.

 1
 2
 3
 4
 5
 6
 7
 8
 9
10
11
12
13
14
15
16
17
18
19
20
21
22
23
24
25
26
27
28
29
30
31
32
33
34
35
36
37
38
39
40
41
42
<!--
  @component   : modalComponentTemplate
  @description : This acts as a modal template, code has referred from lwcRecipe and slds modal
  @author      : Santanu Boral  
-->
<template>
    <template if:true={showModal}> 
        <section role="dialog" tabindex="-1" 
            aria-labelledby="modal-heading-01" 
            aria-modal="true" aria-describedby="modal-content-id-1" 
            class="slds-modal slds-fade-in-open"
        >
            <div class="slds-modal__container">
                <header class="slds-modal__header slds-theme_success">
                    <lightning-button-icon
                        class="slds-modal__close"
                        title="Close"
                        icon-name="utility:close"
                        icon-class="slds-button_icon-inverse"
                        onclick={handleDialogClose}
                    ></lightning-button-icon>
                    <h2 id="modal-heading-01" class="slds-modal__title slds-hyphenate" >
                        {header}
                    </h2>  
                </header>
                
                <!--unnamed slot where the implementer can inject their component-->
                <div class="slds-modal__content slds-p-around_medium" id="modal-content-id-1">
                    <slot></slot>
                </div>
                
                <footer class="slds-modal__footer">
                    <slot
                        name="footer"
                        onslotchange={handleSlotFooterChange}
                    ></slot>
                </footer>
            </div>
        </section>
        <div class="slds-backdrop slds-backdrop_open"></div>
    </template>
</template>


modalComponentTemplate.js


 1
 2
 3
 4
 5
 6
 7
 8
 9
10
11
12
13
14
15
16
17
18
19
20
21
22
23
24
25
26
27
28
29
30
31
32
33
34
35
36
37
import { LightningElement,api } from 'lwc';

export default class ModelComponentTemplate extends LightningElement {
    showModal = false;
    @api
    set header(value) {
        this._headerPrivate = value;
    }
    get header() {
        return this._headerPrivate;
    }
    
    _headerPrivate;
    
    @api show() {
        this.showModal = true;
    }

    @api hide() {
        this.showModal = false;
    }
    handleDialogClose() {
        //Let parent know that dialog is closed (mainly by that cross button)
        // so it can set proper variables if needed
        const closedialog = new CustomEvent('closedialog');
        this.dispatchEvent(closedialog);
        this.hide();
    }
    
    handleSlotFooterChange() {
        // Only needed in "show" state. If hiding, we're removing from DOM anyway
        if (this.showModal === false) {
            return;
        }
        const footerEl = this.template.querySelector('footer').hide();        
    }
}

Let's go through Create Record Form component.

createRecordFromFieldset.html


In this file lightning-record-edit-form has been used, there will be no buttons, just the fields will be displayed from field set. Form submission will be handled from parent i.e. Container component. Sounds interesting!

 1
 2
 3
 4
 5
 6
 7
 8
 9
10
11
12
13
14
15
16
17
<!--
  @component   : createRecordFromFieldset
  @description : This component displays fields from fieldset. 
                 There is no submit button in this component, form is submitted programmatically.
  @author      : Santanu Boral  
-->
<template>
  <lightning-record-edit-form 
        object-api-name={sfdcObjectApiName} 
        onsuccess={handleSuccess}>
    <lightning-messages></lightning-messages>
    <template for:each={inputFieldAPIs} for:item="item">  
        <lightning-input-field field-name={item} name={item} key={item} id={item}>          
        </lightning-input-field>
</template> </lightning-record-edit-form>
</template>

createRecordFromFieldset.js


Few notable points in this js file:
  • Container will pass the values of sfdcObjectApiName and fieldSetName as attributes.
  • implicit call to Apex class to fetch field details in connectedCallback()
  • In the renderedCallback() cmploaded event has been raised, so that spinner can be closed by Container. Check Container js code an interesting way to hide spinner.
  • handleSubmit public method is called from Container to submit the lightning-record-edit-form

this.template.querySelector('lightning-record-edit-form').submit();
  • It will automatically fire onsuccess event and handleSuccess() handler will propagate postsuccess event to Container so the modal can be closed.

 1
 2
 3
 4
 5
 6
 7
 8
 9
10
11
12
13
14
15
16
17
18
19
20
21
22
23
24
25
26
27
28
29
30
31
32
33
34
35
36
37
38
39
40
41
42
43
44
45
46
47
48
49
50
51
52
53
54
55
56
57
58
59
60
61
62
63
64
65
66
67
68
69
70
71
72
73
74
75
76
77
78
/*
 *   Author: Santanu Boral
*/
import { LightningElement,api, track } from 'lwc';
import getFieldsFromFieldSet from '@salesforce/apex/FieldSetHelper.getFieldsFromFieldSet';
import { ShowToastEvent } from 'lightning/platformShowToastEvent';

export default class CreateRecordFromFieldset extends LightningElement {
    lblobjectName; //this displays the Object Name whose records are getting displayed
    inputFieldAPIs = [];
    renderCall = false;

    //get its value from container component through attributes
    @api sfdcObjectApiName; //Case
    @api fieldSetName; //QuickCaseFS

    //load the record edit form with fields from fieldset.
    connectedCallback(){
        let objectApiName = this.sfdcObjectApiName;
        let fieldSetName = this.fieldSetName;

        //make an implicit call to fetch fields from database
        getFieldsFromFieldSet({ strObjectApiName: objectApiName,
            strfieldSetName: fieldSetName}
        )
        .then(data=>{        
            let items = []; //local array to hold the field api

            //get the entire map
            let objStr = JSON.parse(data);   
            //get the list of fields, its a reverse order to extract from map
            let listOfFields = JSON.parse(Object.values(objStr)[1]);
            //get the object name
            this.lblobjectName = Object.values(objStr)[0];
            //prepare items array using field api names            
            listOfFields.map(element=>items.push(element.fieldPath));      
                  
            this.inputFieldAPIs = items;                              
            this.error = undefined;   
        })
        .catch(error =>{
            this.error = error;
            console.log('error',error);                
            this.lblobjectName = objectApiName;
        })
    }
    
    renderedCallback(){
        if(!this.renderCall){
            this.renderCall = true;
            this.dispatchEvent(
                new CustomEvent('cmploaded')
            );            
        }
    }

    //This method submits the record edit form and getting called from container component
    @api
    handleSubmit(){        
        this.template.querySelector('lightning-record-edit-form').submit();        
    }

    //This event handler fires on post submit and displays success and propagate event to container
    handleSuccess(event) {
        const evt = new ShowToastEvent({
            title:  this.lblobjectName + " created",
            message: "Record ID: " + event.detail.id,
            variant: "success"
        });
        this.dispatchEvent(evt);

        //raise event to parent to handle this and to close the popup, specify bubbles=true
        this.dispatchEvent(
                new CustomEvent('postsuccess'),
                { bubbles: true }
        );        
    }
}

Let's check the apex class which fetches field details from field set.

FieldSetHelper.cls


Few notable points:
  • Using reflection, SObject instance has been created which must faster than Schema.getGlobalDescibe().

(SObject)(Type.forName('Schema.'+ strObjectApiName)?.newInstance());
         
    • Use of Safe Navigation Operator to avoid Null Point Exceptions
    • Object label has been returned which will support language translation.

     1
     2
     3
     4
     5
     6
     7
     8
     9
    10
    11
    12
    13
    14
    15
    16
    17
    18
    19
    20
    21
    22
    23
    /**
     * @author : Santanu Boral 
    **/
    public with sharing class FieldSetHelper {
        
        @AuraEnabled (cacheable=true)
        public static String getFieldsFromFieldSet(String strObjectApiName, String strfieldSetName){
            if(!String.isEmpty(strObjectApiName) && !String.isEmpty(strfieldSetName)){   
                Map<String, String> returnMap = new Map<String, String>();
    
                //get fields from FieldSet
                SObject sObj = (SObject)(Type.forName('Schema.'+ strObjectApiName)?.newInstance());
                List<Schema.FieldSetMember> lstFSMember = 
                    sObj?.getSObjectType()?.getDescribe()?.fieldSets.getMap().get(strfieldSetName)?.getFields();
                    
                returnMap.put('FIELD_LIST',JSON.serialize(lstFSMember));
                returnMap.put('OBJECT_LABEL', sObj?.getSObjectType()?.getDescribe()?.getLabel());
    
                return JSON.serialize(returnMap);
            }                                                                 
            return null;
        }
    }
    
     
    There is small Spinner component has been created just to use HTML.

    lwcSpinner


    HTML as below

    <template>    
        <div class="slds-spinner_container">
            <div class="slds-spinner_brand  slds-spinner slds-spinner_large slds-is-relative" role="alert">
                <span class="slds-assistive-text">Loading...</span>
                <div class="slds-spinner__dot-a"></div>
                <div class="slds-spinner__dot-b"></div><br>
                <br>            
            </div>
        </div>    
    </template>
    

    css as below

    We will see how we have made it hidden using css classList in Container component.

    .slds-spinner_container {     
        content: 'Please wait.....!';
        text-align: center;
        z-index: 10000;
        position: fixed;
        background-color: rgba(0, 0, 0, 0.002);
    }
    
    .spinner-hidden {
        display: none;
    }
    

    Let's move on final Container component.

    lwcCreateRecordModalContainer


    This component holds showModal button for opening modal, injects child components to the slots and submits the form.


    lwcCreateRecordModalContainer.html


     1
     2
     3
     4
     5
     6
     7
     8
     9
    10
    11
    12
    13
    14
    15
    16
    17
    18
    19
    20
    21
    22
    23
    24
    25
    26
    27
    28
    29
    30
    31
    32
    33
    34
    35
    36
    37
    38
    39
    40
    41
    42
    43
    44
    45
    46
    <!--
      @component   : lwcCreateRecordModalContainer
      @description : This acts as pop-up container which re-uses popup template 
                     and injects fieldset component and buttons into the slots.
      @author      : Santanu Boral 
    -->
    <template>
        <lightning-card title="Create quick case" icon-name="custom:custom19">
            <!--show modal button on open modal-->
            <lightning-button
                    label="Show modal"
                    onclick={handleShowModal}
            ></lightning-button>        
            
            <c-modal-component-template 
                header={header} 
                onclosedialog={handleCancelModal}            
                >
                <!--display create record component inside unnamed slot-->
                <template if:true={showSpinner}>                
                    <c-lwc-spinner></c-lwc-spinner>            
                </template>
                <c-create-record-from-fieldset 
                        sfdc-object-api-name={SFDCobjectApiName} 
                        field-set-name={fieldSetName}   
                        onpostsuccess={handlePostSuccess}
                        oncmploaded={handleCreateRecordCmpLoaded}             
                ></c-create-record-from-fieldset>
    <!-- inject footer submit & cancel buttons into the slot--> <div slot="footer"> <lightning-button label="Cancel" variant="neutral" onclick={handleCancelModal} ></lightning-button>&nbsp;
    <lightning-button label="Submit" type="submit" variant="brand" onclick={handleSubmitModal} ></lightning-button>
    </div> </c-modal-component-template>
    </lightning-card>
    </template>

    lwcCreateRecordModalContainer.js


    Few notable points:
    • It passed attribute values to createRecord component which is getting captured through design attributes like: sfdc-object-api-name={SFDCobjectApiName}
    • Spinner loaded when this component is loaded.
    • After createRecord component loads all the fields then based on oncmploaded event handler, spinner is made hidden. The below code adds display: none into the css class to hide this. No other if-else logic written.

    this.template.querySelector('c-lwc-spinner').classList.add(CSS_CLASS);
      • After createRecord component saves the records, it captures onpostsuccess event and hides the modal.


       1
       2
       3
       4
       5
       6
       7
       8
       9
      10
      11
      12
      13
      14
      15
      16
      17
      18
      19
      20
      21
      22
      23
      24
      25
      26
      27
      28
      29
      30
      31
      32
      33
      34
      35
      36
      37
      38
      39
      40
      41
      42
      43
      44
      /*
       *   Author: Santanu Boral
      */
      import { LightningElement,api } from 'lwc';
      
      const CSS_CLASS = 'spinner-hidden';
      export default class LwcCreateRecordModalContainer extends LightningElement {    
      
          //following values are passed from design attributes
          @api header; //Create Case 
          @api SFDCobjectApiName; //Case
          @api fieldSetName; //'QuickCaseFS'
          showSpinner;
      
          //this calls for modal to display
          handleShowModal() {    
              this.showSpinner = true;
              this.template.querySelector('c-modal-component-template').show();                
          }
      
          //this makes modal is hidden
          handleCancelModal() {
              this.template.querySelector('c-modal-component-template').hide();        
          }
      
          //This event handler calls the handleSubmit public method of fieldset component
          handleSubmitModal(event){
              this.template.querySelector('c-create-record-from-fieldset').handleSubmit();            
          }
      
          //This postSuccess event handler closes the modal
          handlePostSuccess(event){
              event.stopPropagation();
              this.handleCancelModal();
          }
      
          //This makes spinner to be hidden
          handleCreateRecordCmpLoaded(event){
              setTimeout(()=>{
                  this.template.querySelector('c-lwc-spinner').classList.add(CSS_CLASS);
                  this.showSpinner = false;
              }, 1200);        
          }
      }
      

      Finally, we are done with preparing the components.

      Let's Test this!


      First create a field set QuickCaseFS with Subject, Status, Origin and Description.


      Create a page from AppBuilder and place lwcCreateRecordModalContainer component and pass the values.


      Finally, open the page and click on Show Modal button and component will open.

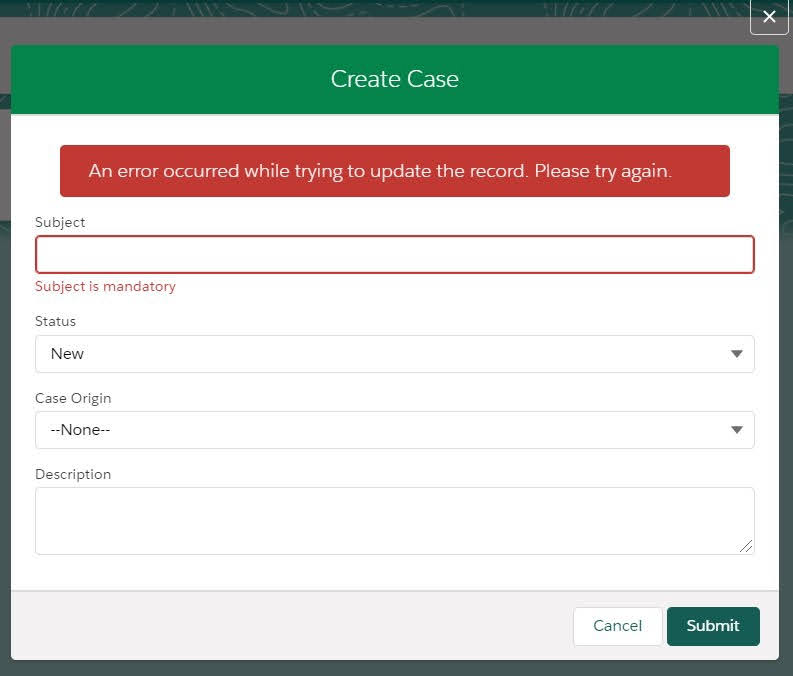
      I have also created a validation rule on Case object to make Subject as Mandatory which works wells during submit as follows.


      Issue fixing


      We might face an issue if we have a dropdown list and when we click on dropdown, there is a right side scrollbar and user will face hard time to scroll and choose the item. This issue can be fixed as below.


      Atlast, we are done and thanks for your patience to read this!
      References


      Further Reading